Total 3 (delta 0), reused 0 (delta 0), pack-reused 0
To https://github.com/kishoraswar/Remote_Repo.git
* [new branch] master -> master
branch 'master' set up to track 'origin/master'.
HEAD: the current commit your repo is on. Most of the time HEAD points to the latest commit in your current branch, but that doesn't have to be the case. HEAD really just means "what is my repo currently pointing at".
In the event that the commit HEAD refers to is not the tip of any branch, this is called a "detached head".
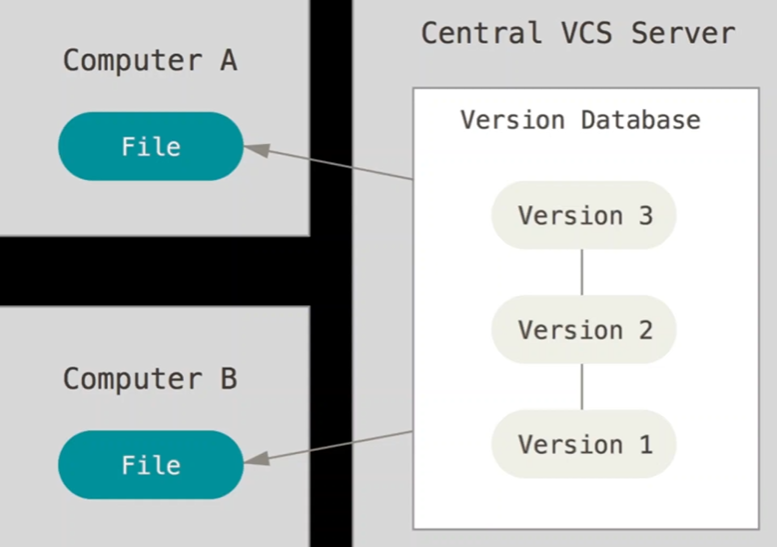
master: the name of the default branch that git creates for you when first creating a repo. In most cases, "master" means "the main branch". Most shops have everyone pushing to master, and master is considered the definitive view of the repo. But it's also common for release branches to be made off of master for releasing. Your local repo has its own master branch, that almost always follows the master of a remote repo.
origin: the default name that git gives to your main remote repo. Your box has its own repo, and you most likely push out to some remote repo that you and all your coworkers push to. That remote repo is almost always called origin, but it doesn't have to be.
Git Origin Master
The term "git origin master" is used in the context of a remote repository. It is used to deal with the remote repository. The term origin comes from where repository original situated and master stands for the main branch. Let's understand both of these terms in detail.
Git Origin
In Git, The term origin is referred to the remote repository where you want to publish your commits. The default remote repository is called origin, although you can work with several remotes having a different name at the same time. It is said as an alias of the system.
The origin is a short name for the remote repository that a project was initially being cloned. It is used in place of the original repository URL. Thus, it makes referencing much easier.
1. git config
Git config command is super helpful. Especially when you are using Git for the first time, or you have a new Git installation. This command will set up your identity - Name and Email address. And this information will be used with every commit.
Usage
$ git config --global user.name "Your name"
$ git config --global user.email "Your email"
2. git version
As its name implies, it's just to check which version of Git you are using. At the moment, writing this guide, the latest version of Git for Windows is 2.31.1. It was released on 27th March 2021.
Usage
$ git version
3. git init
This is probably the first command you use to start a new project in Git. This command will create a blank new repository, and then you can store your source code inside this repo.
Usage
$ git init
Or you can use the repository name with your git init command.
$ git init <your repository name>
4. git clone
The git clone command will use an existing repository to copy. There is one main difference between the git init and git clone.
You will use the Git clone when you need to make a copy on an existing repository. The git clone command internally uses the git init command first and then checks out all its contents.
Usage
git clone <your project URL>
5. git add
The Git add command will add all the new code files or modified files into your repository. This command offers different options to add files and folders.
Here is the usage of the Git add command.
Usage
$ git add your_file_name (it will add a single file to your staging area)
$ git add * ( this option will add all the modified and new files to the staging area)
6. git commit
This Git command is essential. Your project quality may drop if you will not use this command appropriately. There is another article about how to use Git commands property, and you can read that here.
In simple words, the Git commit will add your changes to your local repository.
Usage
$ git commit -m “your useful commit message”
7. git status
This Git command is convenient to see how many files are there which need your attention. You can run this command at any time.
You can use it in between Git add, and Git commits to see the status.
Usage
$ git status
8. git branch
Most of the time, you have multiple branches in your Git repository. In simple terms, the branch is an independent line of code development.
With the Git branch command, you can manage your branches effectively. There are many different options and switches of the Git branch.
To make it simple, here I will highlight how you can create and delete a Git branch (in case you need more depth, you can refer to - Git Branching and Merging section of this article).
Usage
(i) To list all branches:
$ git branch
(ii) To create a new branch:
$ git branch <branch_name>
(iii) To delete a branch:
$ git branch -d <branch_name>
9. git checkout
This Git command is used to switch between branches. This is one of the powerful git commands and can use used as a swiss knife,
In simple words, here is the syntax to switch to another branch.
Usage
$ git checkout <branch_name>
Also, you can create and checkout to a branch in a single like, here is the usage for that
$ git checkout -b <your_new_branch_name>
10. git remote
Git remote command acts like a border, and If you need to connect with the outside world, you have to use the Git remote command. This command will connect your local repository to the remote.
Once you are connected with the remote repository (with the help of the git remote command), it's time to push your changes to that repository.
Usage
$ git push -u <short_name> <your_branch_name>
Example
$ git push -u origin feature_branch
You should have origin and upstream set up before you use Git push. And here is the command to set up upstream.
Usage
$ git push --cdm <short_name> <branch_name>
Example
$ git push --set-upstream origin feature_branch
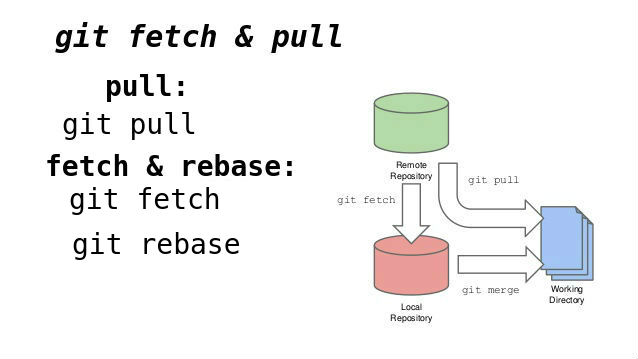
13. git fetch
When you need to download other team members' changes, you have to use git fetch.
This command will download all information for commits, refs, etc., so you can review it before applying those changes in your local repository.
Usage
$ git fetch
14. git pull
The Git pull command downloads the content (and not the metadata) and immediately updates your local repository with the latest content.
Usage
$ git pull <remote_url>
fetch v/s pull
15. git stash
This Git command temporarily stores your modified files. You can work in stashed with the following Git command.
Usage
$ git stash
And you can view all of your stashes with the following command
$ git stash list
And if you need a apply a stash to a branch, simply use apply
$ git stash apply
git stash – Create a stash with local modifications and revert back to the head commit.
git stash list – Display a list of all stashes in your repository.
git stash show – View the content of your most recent stash. This will show your stashed changes as a diff between the stashed content and the commit from back when the stash was created.
git stash drop <stash> – Remove a stash from the list of stashes in your repository.
git stash pop <stash> – Apply a stash to the top of the current working tree and remove it from your list of stashes.
git stash apply <stash> – Apply a stash on top of the current working tree. The stash will not be removed from your list of stashes.
git stash clear – Remove all stashes from your repository.
16. git log
With the help of the Git log, you can see all the previous commits with the most recent commit appear first.
Usage
$ git log
By default, it will show you all the commits of the currently checked out branch, but you can force it to see all the commits of all the branches with all options.
$ git log --all
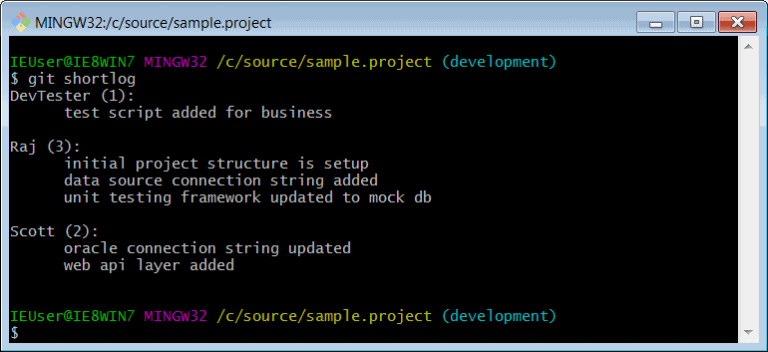
17. git shortlog
The shortlog command shows you a summary from the Git log command. This command is helpful if you are just interested in the short summary.
This command is helpful to see who worked on what as it group author with their commits.
Usage
$ git shortlog
18. git show
Compared to the Git log, this command git show will show you details about a specific commit.
Usage
$ git show <your_commit_hash>
19. git rm
Sometimes you need to delete files from your codebase, and in that case, you can use the Git rm command.
It can delete tracked files from the index and the working directory.
Usage
$ git rm <your_file_name>
20. git merge
Git merge helps you to integrate changes from two branches into a single branch.
Usage
$ git merge <branch_name>
This command will merge the <branch_name> into your current selected branch.
git stash is used to save the changes in present working directory
git stash apply
this command is used to apply the changes which you have saved before with the command git stash
git stash list
this command list all the stashed changes
git stash drop
this command delete the recent stashed chnages.
git remote -v
List all currently configured remote repositories
git push --all origin
Push all branches to your remote repository
git push origin :<branchname>
Delete a branch on your remote repository
git tag 1.0.0 <commitID>
You can use tagging to mark a significant changeset, such as a release
git push --tags origin
Push all tags to remote repository
git fetch origin
fetch the remote changes to local
git reset --hard <sha-value>
this command is used to switch from one commit -id to another [This command discards all history and goes back to the specified commit.]
git reset --mixed
this command is used to switch from one commit to another but ....local changes will remain.
git reset --soft
this command is also used to switch but stage area changes will remain.
git reset <filename>
this command is used to unstage the file
git reset <commit-id>
This command undoes all the commits after the specified commit and preserves the changes locally [unstage all the chnages whatever files present in this commit-id]
git log –follow [filename]
This command lists version history for a file, including the renaming of files also
git show [commit id]
This command shows the metadata and content changes of the specified commit.
git tag [commitID]
This command is used to give tags to the specified commit.
git revert <commitid>
this command is used to remove/delete the commitid and it will create a new commited for history
git rebase -i <commitid>
this command is used to delete the commit id but it will not create a history
git cherry-pick <commit id>
this command is used to copy a sha-value from one branch to other
Git Reset Modes
Git Reset has three modes in which it can work. Each mode will revert changes in one of the three stages of the workflow(Working Directory, Staging Area, and Repository) and will have the functionalities of the previous option. Let's take a look at these three options.
Git Reset --soft
The --soft option is used to reset changes only in the Repository. It works by changing the position of our HEAD to point to the previous commits. However, it keeps the staging area and the working directory as it is.
Git Reset --mixed
The --mixed option has the functionality of the --soft with the additional feature of resetting changes in the staging area. In this mode, Git will first revert changes in the repository by making the HEAD point to one of the previous commits and then also update the Staging Area to the state it was in when that previous commit was used. This is also the default mode that Git Reset uses.
Git Reset --hard
The --hard option is the most powerful one among the three in the sense that it has the functionalities of the above options along with an additional feature. The --hard option will also reset the changes in the working directory after resetting the Repository and the Staging Area. But one must be careful while using this option as all our unsaved changes in the working directory will be lost.