Sunday, August 21, 2022

Sonarqube Installation Steps:

 1)Got to link https://www.sonarqube.org/downloads/

2)download developer edition

 #wget  https://binaries.sonarsource.com/CommercialDistribution/sonarqube-developer/sonarqube-developer-8.9.9.56886.zip

3)unzip sonarqube-developer-8.9.9.56886.zip

4)Create user sonar

5)change owner and permissions for sonarqube

 #chown -R sonar:sonar sonarqube-developer-8.9.9.56886

#chmod -R 777 sonarqube-developer-8.9.9.56886

6)Swith to sonar user

#su - soanr

7)cd /sonarqube/sonarqube-8.9.9.56886/bin/linux-x86-64

8)start sonar using below command

./sonar.sh start

9) check SonarQube service status

./sonar.sh status

10)access SonarQube using below link

http://public-ip:9005


Docker Notes

 What is Docker?

Docker is an open-source containerization platform used for developing, deploying, and managing applications in lightweight virtualized environments called containers.

=====================================================================

Docker Installation on Linux:

#yum install docker

#systemctl start docker

#systemctl status docker

=======================================================================

Virtual Machine V/s Container:


Docker Architecture:


Docker Commands:
#docker info
#docker version

=========================================================================

#Create First Container, List Container, Remove Container

[root@ip-172-31-26-206 ~]# docker container ls

CONTAINER ID   IMAGE     COMMAND                  CREATED         STATUS         PORTS     NAMES

1c726c5b60f5   nginx     "/docker-entrypoint.…"   9 minutes ago   Up 9 minutes   80/tcp    keen_hermann

[root@ip-172-31-26-206 ~]# docker container ps

CONTAINER ID   IMAGE     COMMAND                  CREATED         STATUS         PORTS     NAMES

1c726c5b60f5   nginx     "/docker-entrypoint.…"   9 minutes ago   Up 9 minutes   80/tcp    keen_hermann


[root@ip-172-31-26-206 ~]# docker container run ubuntu cat /etc/os-release

PRETTY_NAME="Ubuntu 22.04.1 LTS"

NAME="Ubuntu"

VERSION_ID="22.04"

VERSION="22.04.1 LTS (Jammy Jellyfish)"

VERSION_CODENAME=jammy

ID=ubuntu

ID_LIKE=debian

HOME_URL="https://www.ubuntu.com/"

SUPPORT_URL="https://help.ubuntu.com/"

BUG_REPORT_URL="https://bugs.launchpad.net/ubuntu/"

PRIVACY_POLICY_URL="https://www.ubuntu.com/legal/terms-and-policies/privacy-policy"

UBUNTU_CODENAME=jammy

[root@ip-172-31-26-206 ~]# docker images
REPOSITORY    TAG       IMAGE ID       CREATED         SIZE
nginx         latest    b692a91e4e15   2 weeks ago     142MB
ubuntu        latest    df5de72bdb3b   2 weeks ago     77.8MB
hello-world   latest    feb5d9fea6a5   11 months ago   13.3kB


[root@ip-172-31-26-206 ~]# docker container ls
CONTAINER ID   IMAGE     COMMAND                  CREATED          STATUS          PORTS     NAMES
1c726c5b60f5   nginx     "/docker-entrypoint.…"   13 minutes ago   Up 13 minutes   80/tcp    keen_hermann
[root@ip-172-31-26-206 ~]# docker container ls -a
CONTAINER ID   IMAGE         COMMAND                  CREATED              STATUS                          PORTS     NAMES
1f3313267cd1   ubuntu        "cat /etc/os-release"    About a minute ago   Exited (0) About a minute ago             quirky_raman
359d72879260   ubuntu        "bash"                   2 minutes ago        Exited (0) 2 minutes ago                  goofy_lehmann
1c726c5b60f5   nginx         "/docker-entrypoint.…"   13 minutes ago       Up 13 minutes                   80/tcp    keen_hermann
acaab62b188b   nginx         "/docker-entrypoint.…"   13 minutes ago       Exited (0) 13 minutes ago                 serene_keller
c638f9707b4c   hello-world   "bash"                   18 minutes ago       Created                                   romantic_napier
15fabda8022f   hello-world   "/hello"                 18 minutes ago       Exited (0) 18 minutes ago                 zealous_elbakyan
a7bb4e808197   hello-world   "/hello"                 19 minutes ago       Exited (0) 19 minutes ago                 relaxed_kare
c048eacebcc2   nginx         "/docker-entrypoint.…"   About an hour ago    Exited (0) About an hour ago              eloquent_euclid


Sunday, August 14, 2022

Deploy Application Using Jenkins to Tomcat

 Steps:

1) CodeBase: https://github.com/kishoraswar/maven-war-project.git

2)Tomcat Setup: 

- Install Tomcat

- Configure User

3) Create Jenkins Job


Thursday, August 11, 2022

Deploy Application on Tomcat

 Steps:

[root@ip-172-31-31-8 webapps]# history

    1  mkdir /middleware

    2  cd /middleware/

    3  wget https://dlcdn.apache.org/tomcat/tomcat-9/v9.0.65/bin/apache-tomcat-9.0.65.tar.gz

    4  ls -l

    5  tar -xvf apache-tomcat-9.0.65.tar.gz

    6  yum install java

    7  ls -l

    8  cd apache-tomcat-9.0.65/

    9  ls -l

   10  cd bin/

   11  ./startup.sh

   12  ps -aef|grep tomcat

   13  cd  ..

   14  ls -l

   15  pwd

   16  ls -l

   17  cd webapps/

   18  ls -l

   19  wget https://github.com/AKSarav/SampleWebApp/raw/master/dist/SampleWebApp.war

   20  ls -l


Wednesday, August 3, 2022

Maven - Build Tool


Learn Maven Tutorial - javatpoint


 Maven - Local, Remote and Central Repositories - HowToDoInJava


Maven Installation:

Maven – Download Apache Maven


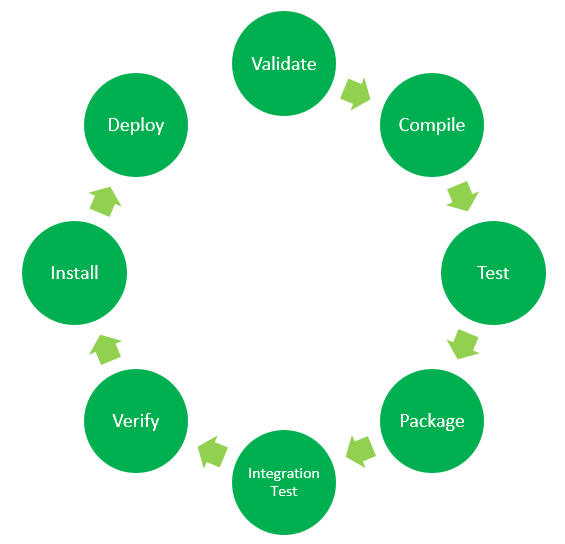
Maven comes with three built-in build life cycle phases:

  • Clean Life Cycle
  • Default Life Cycle
  • Site Life Cycle


Clean:
This Clean Life Cycle is used to clean up or delete the project directory name target and its contents and prepare it for a fresh compile and deployment. The command for this operation is mvn clean.


Default:


validate: Validating the project with all the necessary information is correct.

generate-sources: Generating the source code.

compile: Compilation of project source.

test: Run the generated test cases using a unit test framework like JUnit.


package: Perform the packaging in a distributed format like jar, war or ear.


verify: Verifying the generated distributed package.


install: Install the package into the local repository.

deploy: Copying the final build to a remote repository.


Site:

That phase is called the site phase, and this phase has one of the crucial features of a maven, which is generating detailed documentation of the Project and also preparing reports about the Project.

Demo Project:

https://github.com/kishoraswar/hello-world-1.git

Monday, August 1, 2022

Jenkins Training

Jenkins Installation

Jenkins First Job

Jenkins configuration

Plugin Installation

User Creation

RBAC in Jenkins

Use of Git Plugin Clean Workspace

Trigger job remotely

Upstream and downstream Job

Build periodically

Poll SCM

Jenkins environment variable

Parameterized Jenkins job

Enable and Disable job

Build job concurrent or Parallel

Jenkins custom workspace

Change Jenkins job name

Jenkins pipeline

Continuous delivery and Deployment

Deploy war to tomcat

Jenkins master-slave configuration

Pipeline as a Code

================

Continuous Integration is a development approach in which members work on the same project coordinate to integrate their work more frequently. The code is integrated into a shared repository, and any integration is tested by automated test cases or sequences to look for an error. Each team member is expected to integrate their code at least once a day or more as and when required


Jenkins Pipeline Type:

  • Declarative pipeline syntax
  • Scripted pipeline syntax

The Declarative Pipelines is a relatively new feature that supports the concept of code pipeline. It enables the reading and writing of the pipeline code. This code is written within a Jenkinsfile, which can be tested into a tool such as Git for source control.

The Scripted pipeline is a typical method of code writing. The Jenkinsfile is written on the Jenkins user interface instance in this pipeline.

While both of these pipelines are Groovy-based, the scripted pipeline uses more strict Groovy-based syntaxes. This is because it was the first groovy foundation pipeline that was created for use. As this Groovy script was not usually suitable to all users, it introduced the declarative pipeline to provide a simpler and more flexible Groovy syntax. The declarative pipeline is defined within a ‘pipeline’ block, while the scripted pipeline is defined within a ‘node’ block.

================
Connect to Github Private Repository:

Step 1) Create a token:

settings-->developer settings-->personal access tokens -->generate new token

Step 2) In Global Credentials add username(GithubHub) and password as a token.


Sample Game App Deployment on EKS cluster

 https://padmakshi.medium.com/setting-up-an-eks-cluster-and-deploying-a-game-application-a-step-by-step-guide-08790e0be117